
For over a decade I ran Postfix on a Linux server for my email. It required a lot of setup initially, but it worked perfectly. Would I recommend that pathway to anyone else?
Well, no.
Technical efforts aside (which were substantial) there was a cognitive load in running my own server. What if it was hacked or attacked? What about spam reputation and message deliverability?
Also every account recovery mechanism on the planet is happy to send a password reset link to your email address. A hacked email server permits an attack on all your other accounts too.
So at the start of 2025 I decided to try something different. I moved the responsibility for sending and receiving email out of my little EC2 frying pan and into the AWS Simple Email Service (SES).
Have I traded one set of problems for another?
The new setup is more portable and feels like less of a technical burden than a single server sitting on the public internet, it certainly has less cognitive burden from a security perspective.
Email for maniacs? I do have a tendency to find solutions that are a little unrelatable. And so would I recommend this way of doing things to others?
Well, maybe.
I like it quite a lot. But unless you know the ins-and-outs of AWS, DNS and mail delivery, it is quite a lot. But feel free to check out the HOWTO below.
I will say, it's the best solution I have so far. Very secure, high level of control, "serverless" and aside from my time-spent, basically free to run.
Overview
When someone emails me:
- Email is received by AWS SES and automatically delivered to an S3 bucket
- A cron job running on a server at home, polls that bucket every 2 minutes for new mail
- Then downloads the email and runs it through procmail for any filtering and spam detection
- Then saves the email to a Maildir folder on my NAS/NFS
When I send email to others:
- Email is composed locally (mutt)
- Email client configured to send email through AWS SES SMTP servers
- AWS SES SMTP delivers the email to the recipients
How do I access my email when I'm working remotely or on my phone? The short answer is VPN (wireguard/tailscale) back home to where the mail is stored. I might leave that part of it for another time.
HOWTO
Ok this looks appalling. But most of it is just DNS setup and you can
glean most of it from the AWS SES Identity creation section in the AWS web
console. I'll walk you through it anyway using a domain name of mine that I never
figured out what to do with: alouy.com.
- Get your domain name registration and DNS out of AWS Route53 Just my opinion, but this ensures that DNS names can always be redirected elsewhere in times of serious trouble with AWS. Eg, in the examples below I've screenshotted the Cloudflare DNS manager.
- Deactivate the SES limits sandbox This normally takes a support ticket conversation with AWS (and I suspect the process is designed to dissuade you) but basically you want to ensure that for the AWS region you care about, your AWS SES service is not still in the email limits sandbox.
-
Create a new AWS SES Identity for your domain name
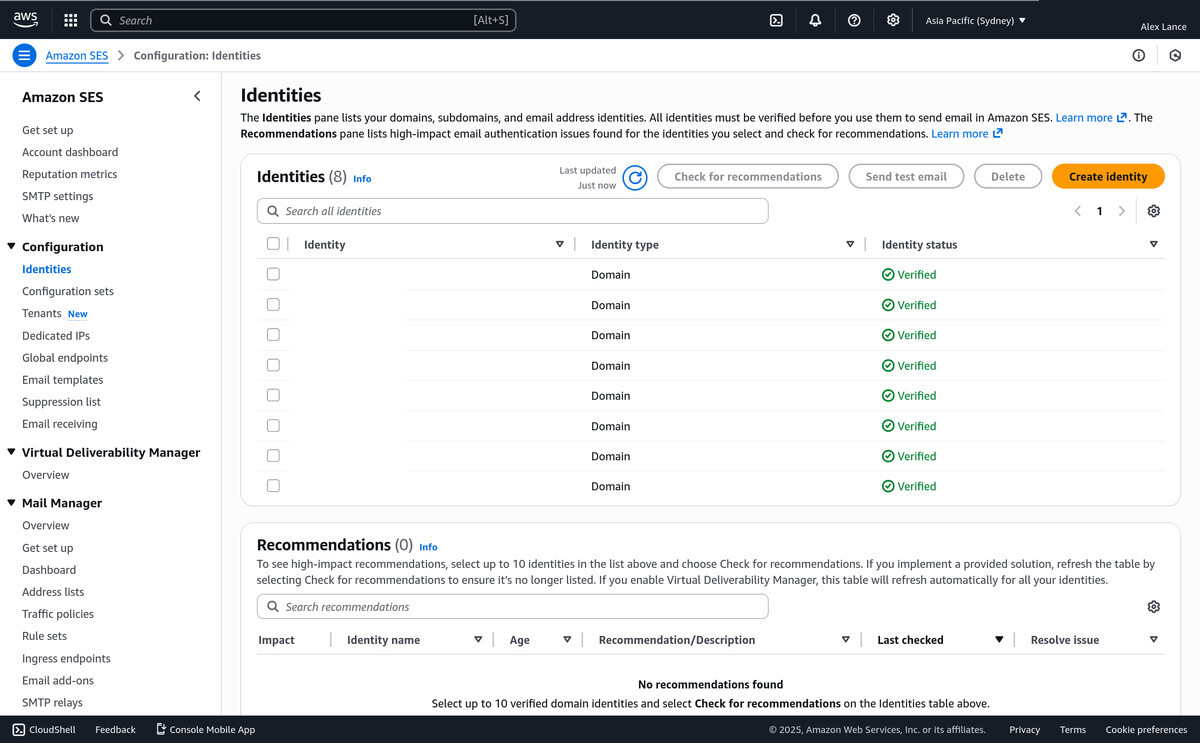
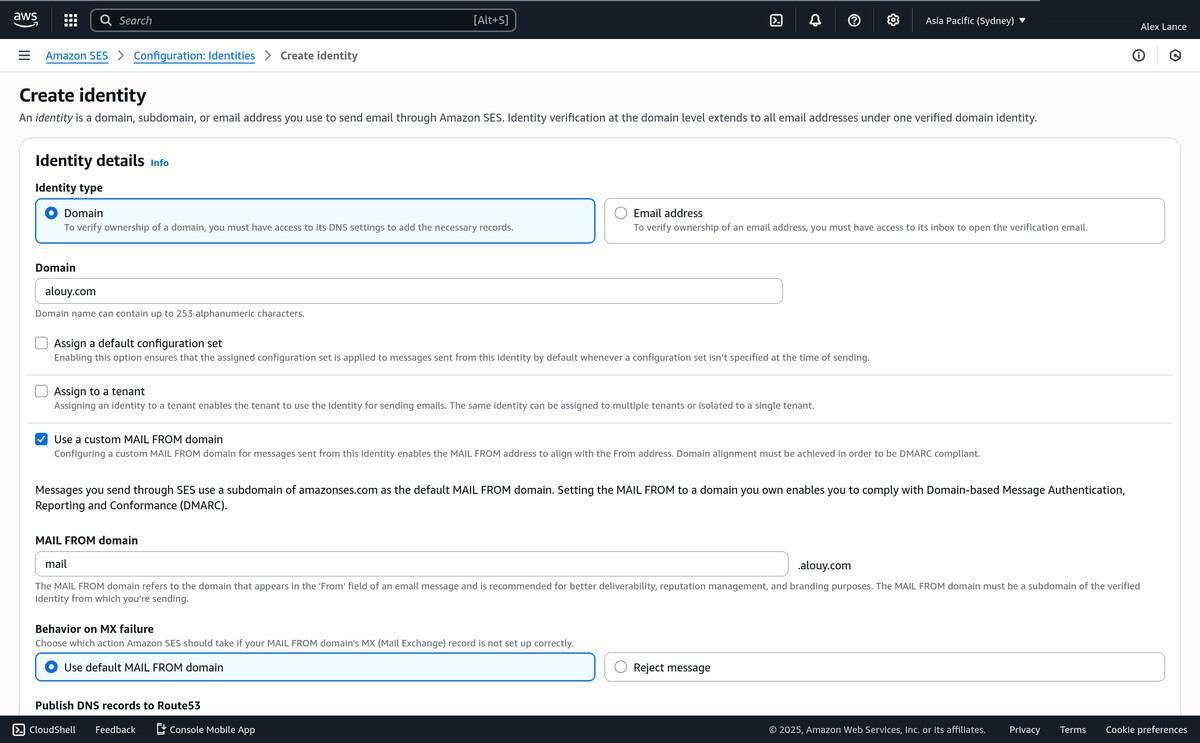
- In your AWS SES region, click the Create Identity Button
- Identity Type: Domain
- Enter your domain name (eg for me: alouy.com)
- Select the checkbox for "Use a custom MAIL FROM domain"
- Make up a sub-domain for the MAIL FROM, eg in my case: mail.alouy.com
- Publish DNS records to Route53? As mentioned above I'd suggest no, it does mean you've got to do all your DNS records manually, but thankfully AWS displays the exact records you need on the SES Identity create page.
-
Verify your Domain with DKIM
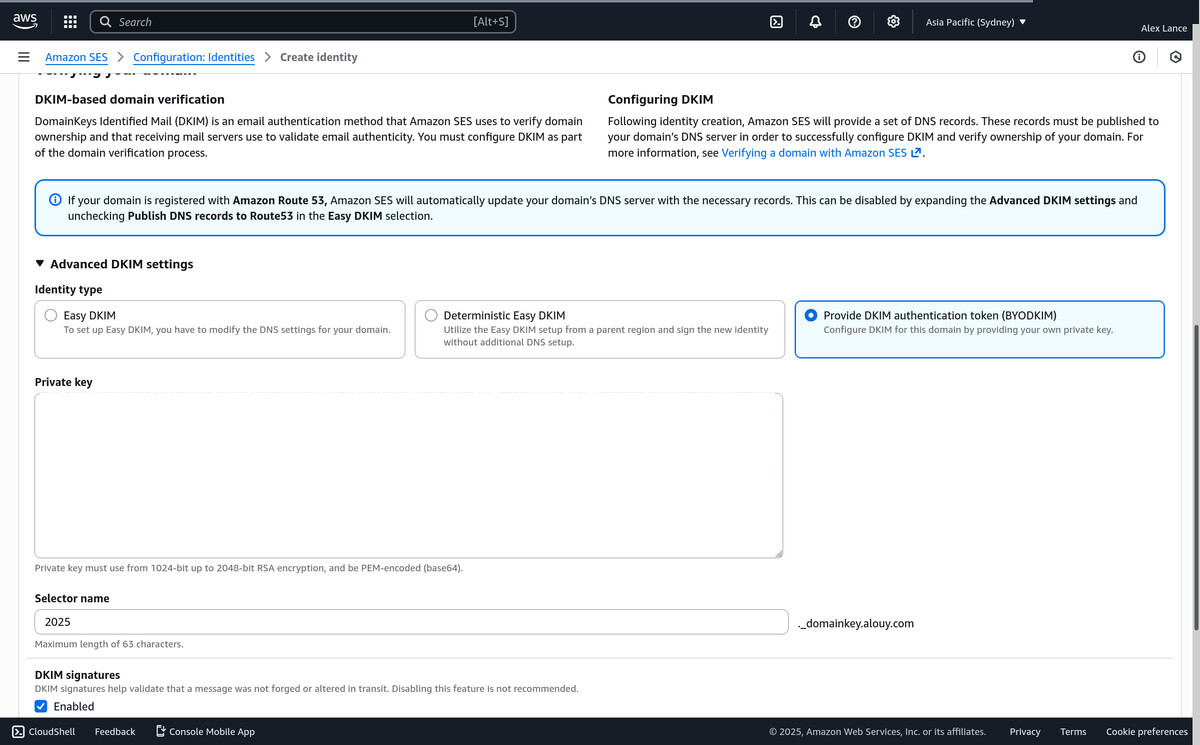
- DKIM is a system which basically makes your email look less like spam to others and helps provide assurance that your email message hasn't been tampered with in-transit.
- Expand: Advanced DKIM Settings
-
If you choose the option to provide the DKIM authentication key
yourself (BYODKIM) you will need to paste a private key that you generate.
The command to generate a key is:
opendkim-genkey -b 2048 -h sha256 -r -s 2025 -d alouy.com -v(swap your own domain in). This will generate two files: 2025.private is the one you paste into the AWS Private Key box.2025.private
MIIEvgIBADANBS<snip>cl5OnXMurv1FmmqT3X8T+30o5ztb9kwem==- Remove the header and footer that say:
-----BEGIN/END PRIVATE KEY----- - Remove all the newlines from the key. I.e. it should be one long line in the text box (tread carefully on this one!)
- Ensure the key ends in two equals signs
- Remove the header and footer that say:
- As a selector name, enter the "-s" argument that you specified in the opendkim-genkey command. Note this could have been anything, but I chose to use the year the key was created.
-
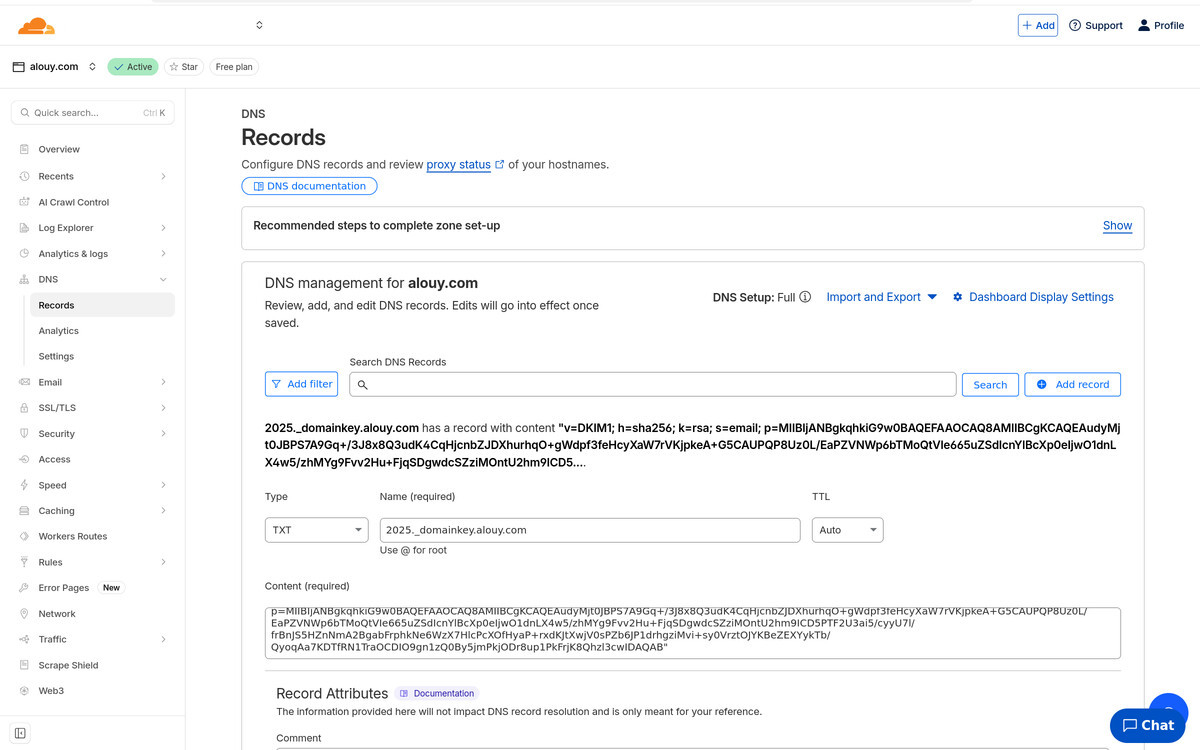
Now we need to publish some DNS records to activate our DKIM
configuration
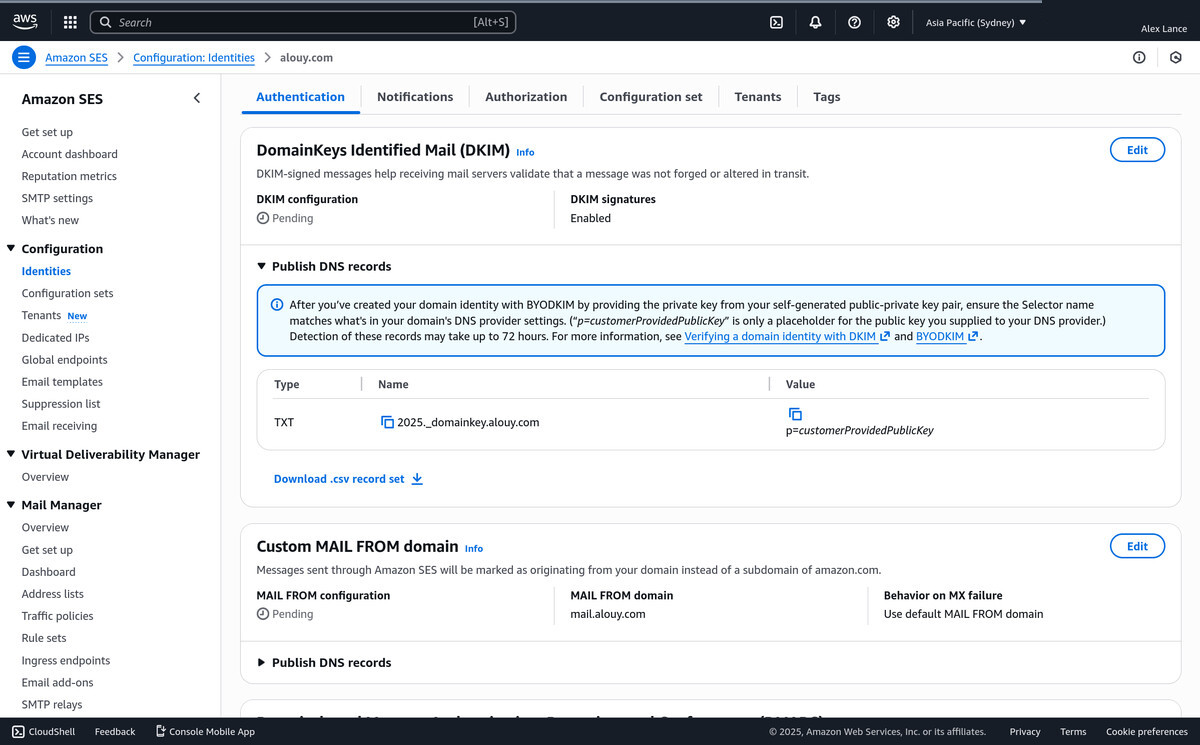
You can see that AWS wants us to publish a TXT flavoured DNS record, where the domain name is set to: 2025._domainkey.alouy.com and the value of that is contained in the 2025.txt file that was generated from the opendkim-genkey command above. In my case the contents of that file look like:2025.txt
2025._domainkey IN TXT ( "v=DKIM1; h=sha256; k=rsa; s=email; " "p=MIIBIjANBgkqhkiG9w0BAQEFAAOCAQ8AMIIBCgKCAQEAudyMjt0JBPS7A9Gq+/3J8x8Q3udK4CqHjcnbZJDXhurhqO+gWdpf3feHcyXaW7rVKjpkeA+G5CAUPQP8Uz0L/EaPZVNWp6bTMoQtVIe665uZSdIcnYlBcXp0eIjwO1dnLX4w5/zhMYg9Fvv2Hu+FjqSDgwdcSZziMOntU2hm9ICD5PTF2U3ai5/cyyU7l/frBnJS5HZnNmA2Bg" "abFrphkNe6WzX7HlcPcXOfHyaP+rxdKJtXwjV0sPZb6JP1drhgziMvi+sy0VrztOJYKBeZEXYykTb/QyoqAa7KDTfRN1TraOCDIO9gn1zQ0By5jmPkjODr8up1PkFrjK8Qhzl3cwIDAQAB" ) ; ----- DKIM key 2025 for alouy.com2025.txt (transformed)
"v=DKIM1; h=sha256; k=rsa; s=email; p=MIIBIjANBgkqhkiG9w0BAQEFAAOCAQ8AMIIBCgKCAQEAudyMjt0JBPS7A9Gq+/3J8x8Q3udK4CqHjcnbZJDXhurhqO+gWdpf3feHcyXaW7rVKjpkeA+G5CAUPQP8Uz0L/EaPZVNWp6bTMoQtVIe665uZSdIcnYlBcXp0eIjwO1dnLX4w5/zhMYg9Fvv2Hu+FjqSDgwdcSZziMOntU2hm9ICD5PTF2U3ai5/cyyU7l/frBnJS5HZnNmA2BgabFrphkNe6WzX7HlcPcXOfHyaP+rxdKJtXwjV0sPZb6JP1drhgziMvi+sy0VrztOJYKBeZEXYykTb/QyoqAa7KDTfRN1TraOCDIO9gn1zQ0By5jmPkjODr8up1PkFrjK8Qhzl3cwIDAQAB"
-
Now if you refresh the AWS SES page for your domain, you should see a little green tick underneath the domain name that says Verified.
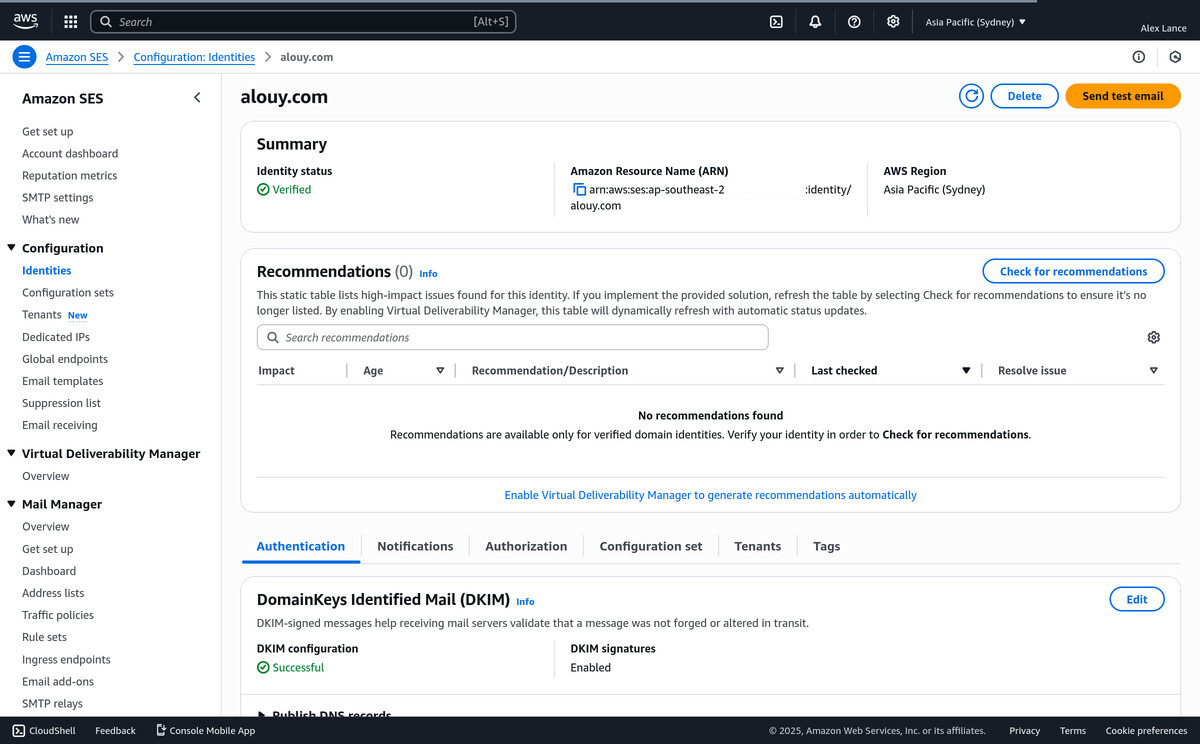
-
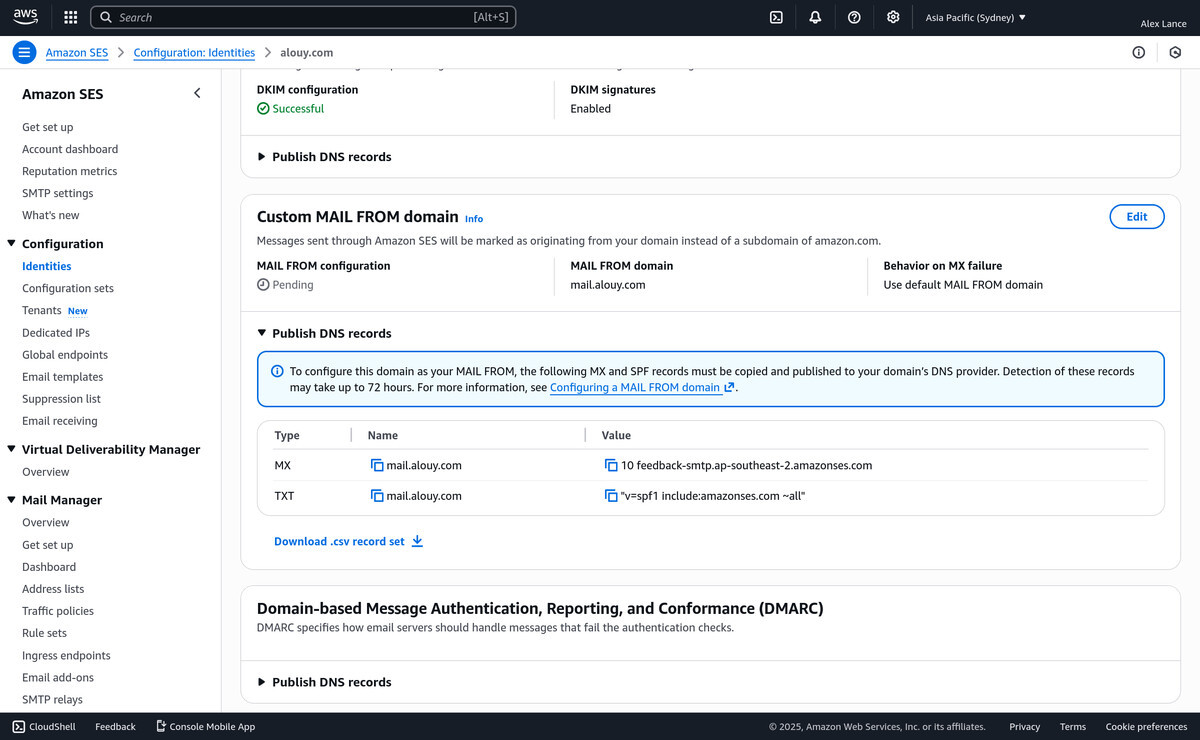
Setup MAIL FROM
Remember how we told AWS we wanted to use mail.alouy.com as our custom
MAIL FROM? Well we need to setup more DNS records to allow that to happen.
-
Expand the "Publish DNS Records" bit in AWS. It'll tell us what new
DNS records to add. In this case an MX record and a TXT record for
mail.alouy.com. So back to our DNS manager to add in the two new records.

-
Now when we refresh the AWS page, you should see the "Pending"
underneath the MAIL FROM Configuration change to "Successful". Note that this
one sometimes takes a little while.
-
Expand the "Publish DNS Records" bit in AWS. It'll tell us what new
DNS records to add. In this case an MX record and a TXT record for
mail.alouy.com. So back to our DNS manager to add in the two new records.
-
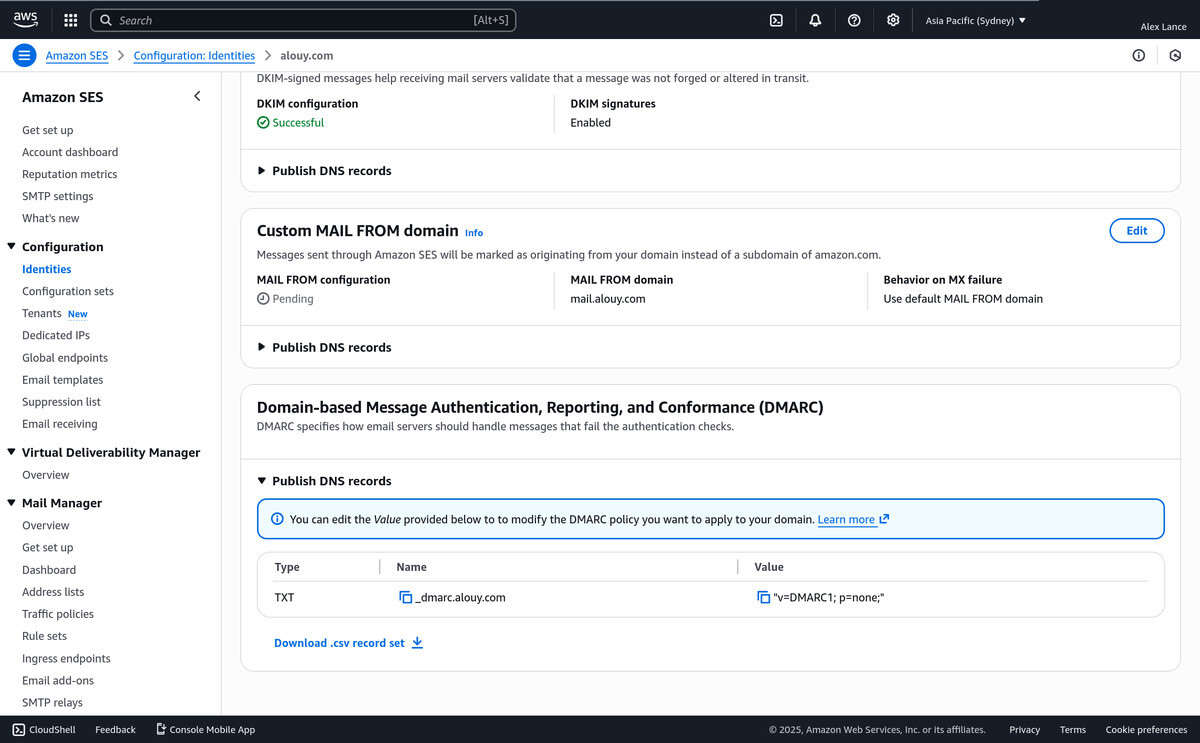
Setup DMARC
While we're waiting lets add DNS records in for DMARC (Domain-based Message
Authentication, Reporting, and Conformance). Same deal as before, you open up
the Publish DNS records section and it'll tell you what new DNS records need to
exist. For me it's just a new
TXT record for _dmarc.alouy.com.
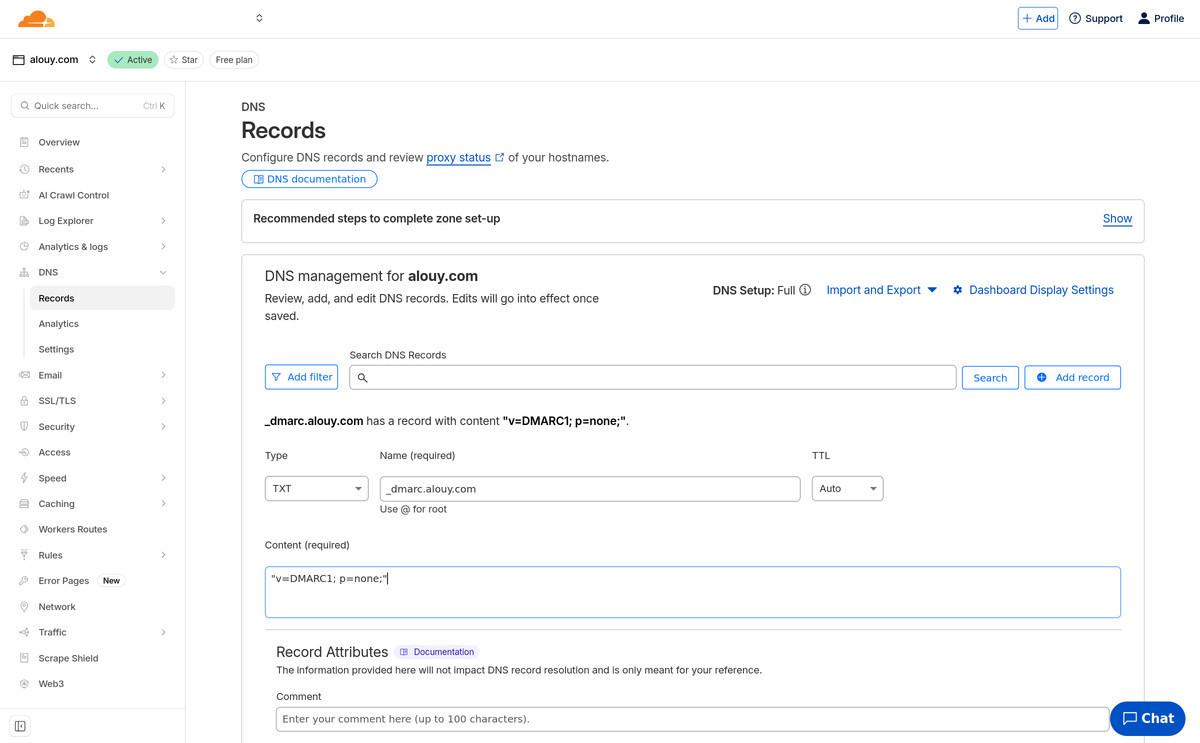
- Verify the verifications Now when you refresh the AWS SES page, you should see all green "Successful" messages there. If not, very carefully check the DNS records you added, wait 10 minutes, then check again.
-
Sending email
-
You'll need one more DNS record to send email out.
For me, using AWS SES in the ap-southeast-2 region, I'll need a record like:
          Email sending DNS
          MX alouy.com inbound-smtp.ap-southeast-2.amazonaws.com with priority 10
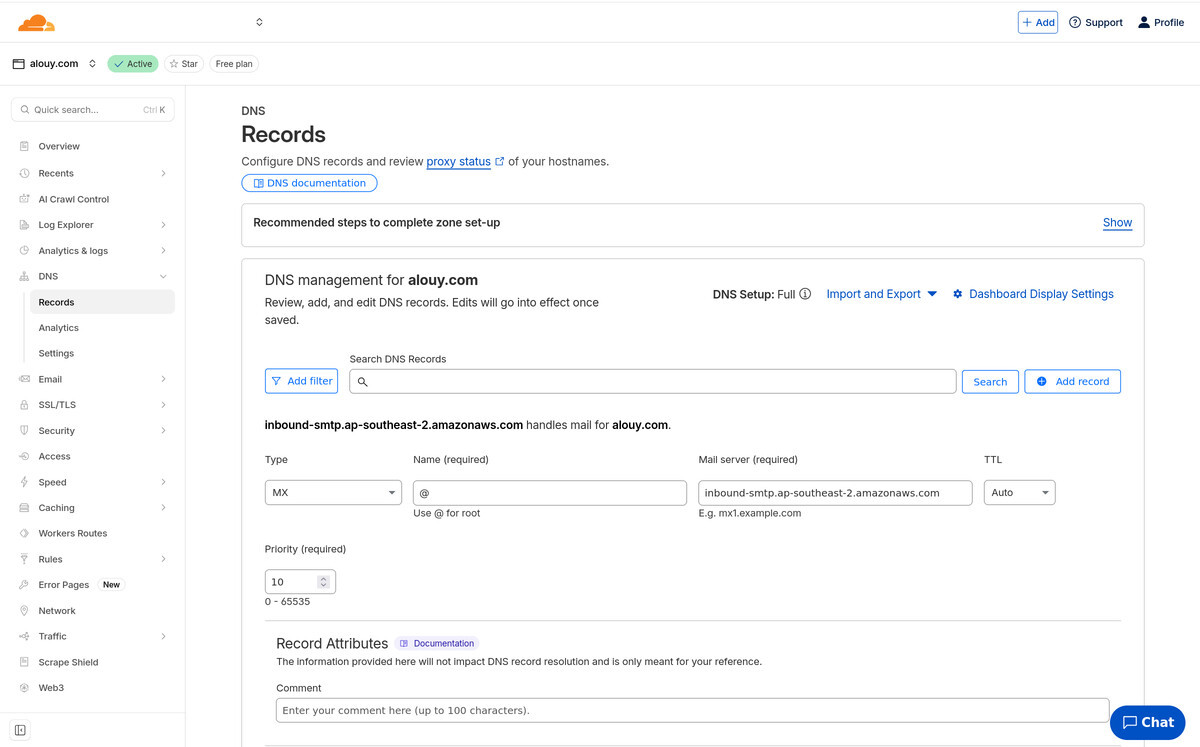
This leaves us with 5 DNS records in total, that look a bit like this:

-
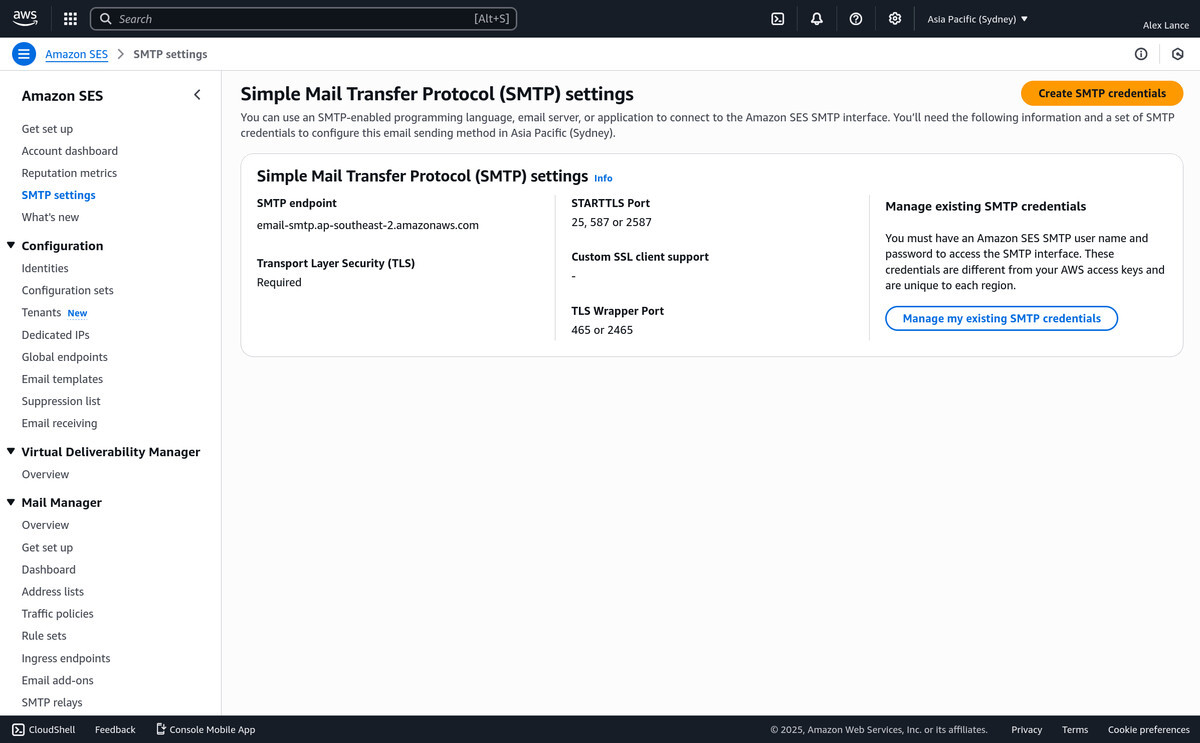
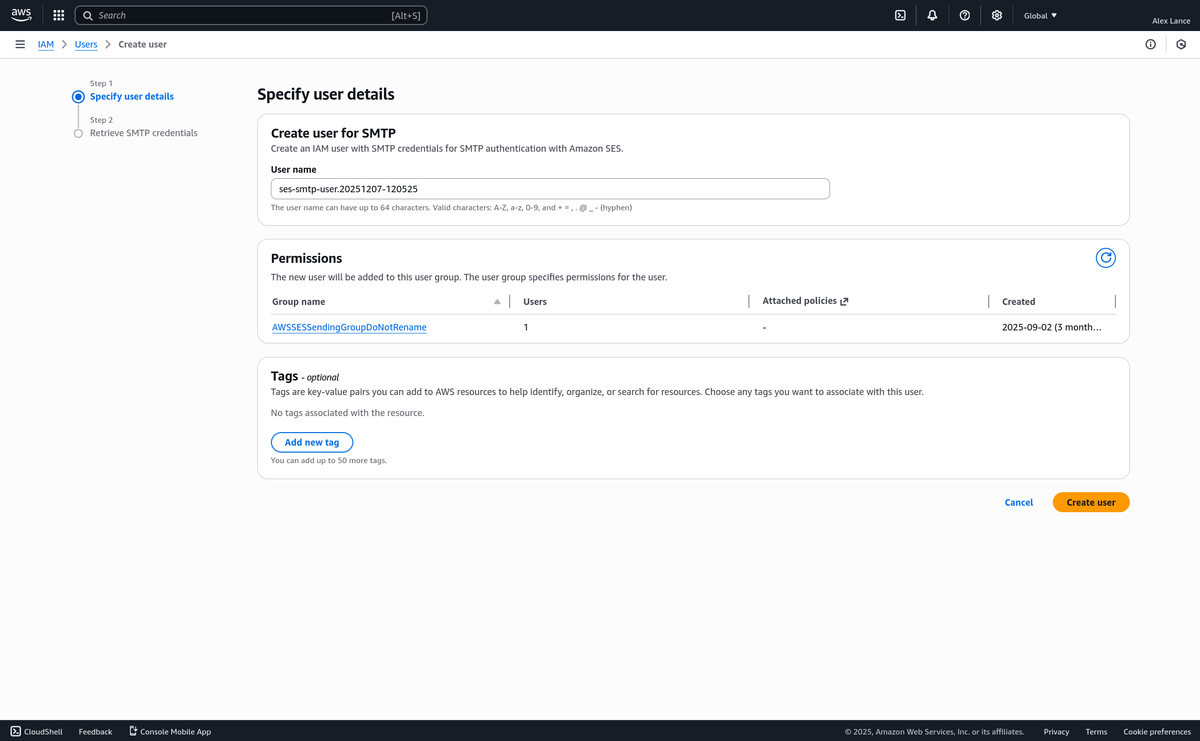
You'll also need some SMTP credentials (that look suspiciously like a
normal AWS Access Key/ID) that'll give your email client permission to send
outbound email through AWS SMTP:
-
Which you then add into your email client's configuration. In my email client mutt, the config for SMTP sending ends up looking like this:
          .muttrc
          # AWS SES ap-southeast-2
          set smtp_url="smtp://AKIAUSERID...@email-smtp.ap-southeast-2.amazonaws.com:587/"
          set smtp_pass="THESECRETPASSWORDGOESHERE..."
-
You'll need one more DNS record to send email out.
For me, using AWS SES in the ap-southeast-2 region, I'll need a record like:
-
Configure mail delivery, and then fetch it
- Create an S3 bucket
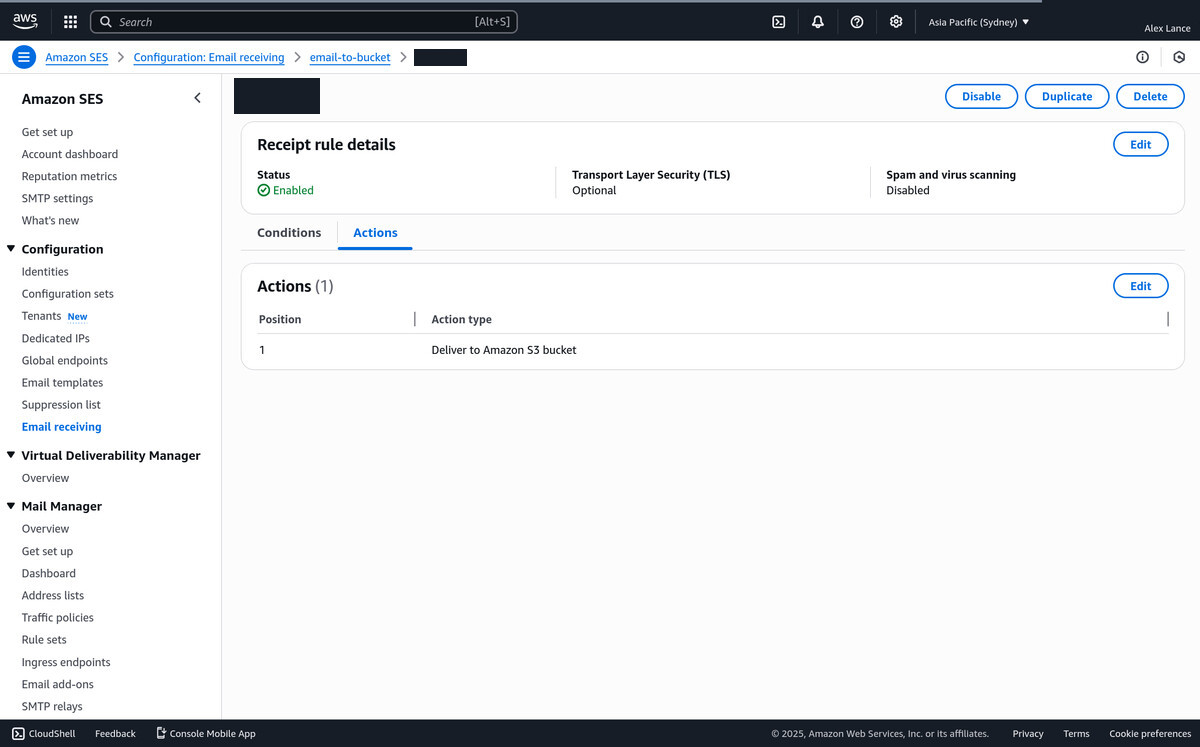
- Go to AWS SES Email Receiving
-
Setup a Ruleset with an action to deliver to your Amazon S3 bucket
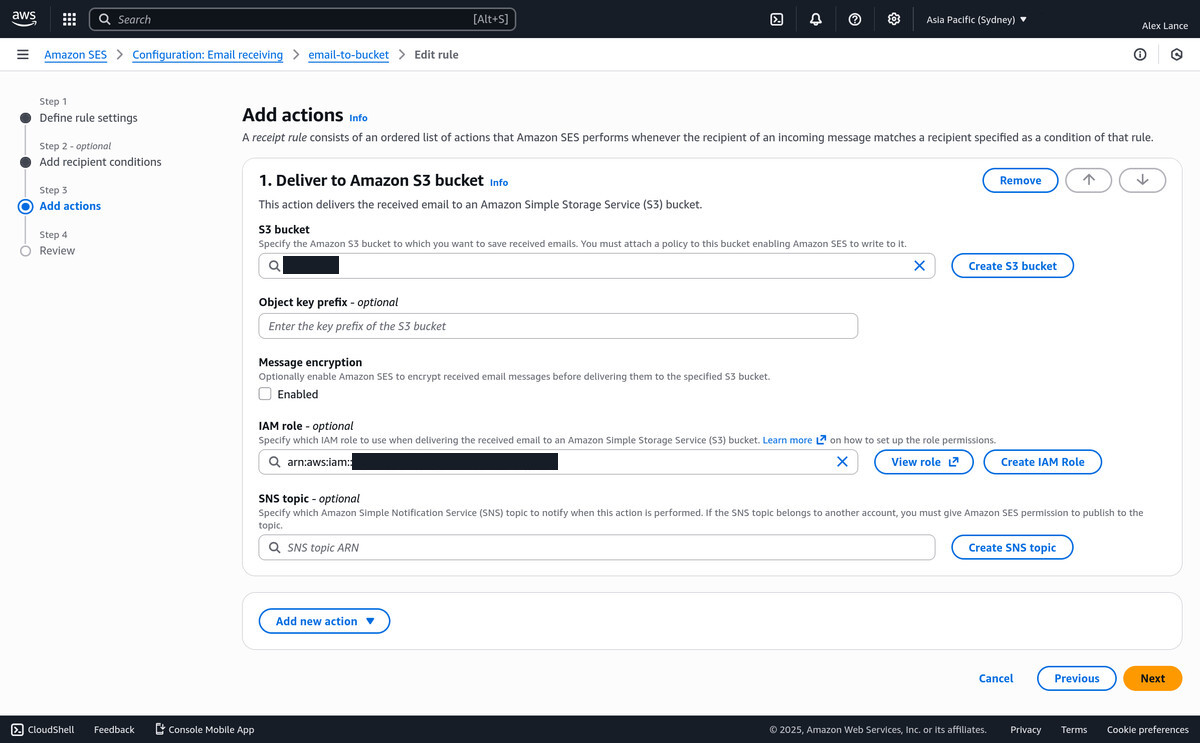
-
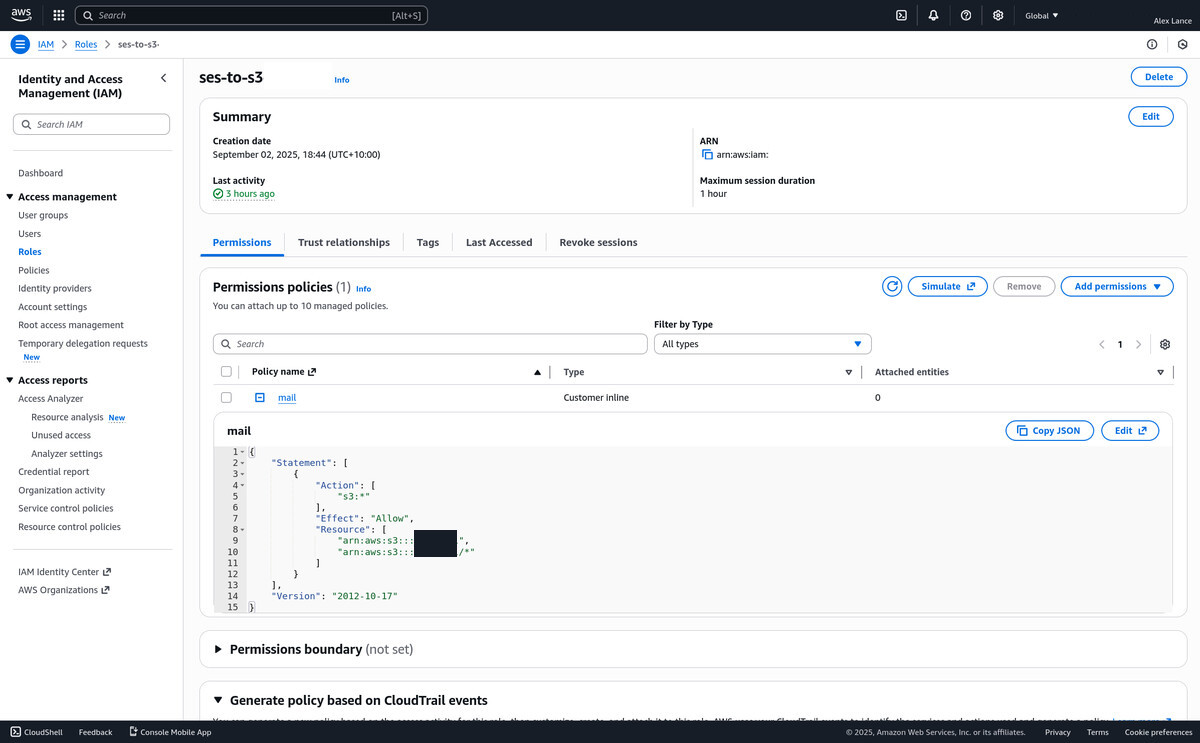
Configure a user with a role that can read and delete the files in the
bucket so you can fetch email. Create an access key for the user, and
then use those credentials in the script that follows.
-
The simplified version of the script that actually fetches the emails
from the S3 bucket. It grabs the email files out of the S3 bucket, then pushes
them locally through procmail (a mail filtering program) which dumps them into the
pertinent local email (maildir) folders.
fetch-mail.sh
#!/bin/bash set -euo pipefail# Credentials to download emails from s3 bucket
BUCKET="MY_MAIL" export AWS_ACCESS_KEY_ID="MY_KEY_ID" export AWS_SECRET_ACCESS_KEY="MY_SECRET_KEY" aws s3api list-objects-v2 --bucket ${BUCKET} --query 'Contents[].{Key: Key} || `[]`' --output text \ | while read -r f; do# copy file to local, fix newlines, and formail to print out subject line
# then run bogofilter spam checker, and procmail to push to specific folder
aws s3 cp --quiet --only-show-errors s3://${BUCKET}/${f} - \ | dos2unix -q \ | tee >(formail -c -X "From:" -x "Subject:" | tr '\n' ' ' >&2) \ | bogofilter --bogofilter-dir ~/.bogofilter -e -p \ | procmail -t -m ~/.procmailrc # script didn't error out, finish transaction aws s3 rm "s3://${BUCKET}/${f}" done -
Trigger by a cron job (or systemd timer) that looks like this:
          cron
*/2 * * * * /path/to/fetch-mail.sh > /dev/null.muttrc
macro index R "!/path/to/fetch-mail.sh\n<sync-mailbox>"~/.procmailrc
MAILDIR=/path/to/Mail/ LOGFILE=/path/to/Mail/procmail.log# just for example, match some words in emails, force them to go to particular mailboxes
:0HB * stripe.com ${MAILDIR}stripe/ :0HB * tfstate ${MAILDIR}tfstate/ :0HB * dibsonstuff ${MAILDIR}dibsonstuff/# file the mail to spam-all if bogofilter said it's spam
:0: * ^X-Bogosity: Spam, tests=bogofilter ${MAILDIR}spam-all/# or if it's only *maybe* spam, file the mail to spam-maybe
:0: * ^X-Bogosity: Unsure, tests=bogofilter ${MAILDIR}spam-maybe/# everything else goes to the inbox
:0 : ${MAILDIR}inbox/